How to set aliases triggers or macros in MushClient |
Category: Online GamesAliases We'll start with aliases. To add a new alias, go to game->configure->aliases or use the shortcut Shift+Ctrl+9. 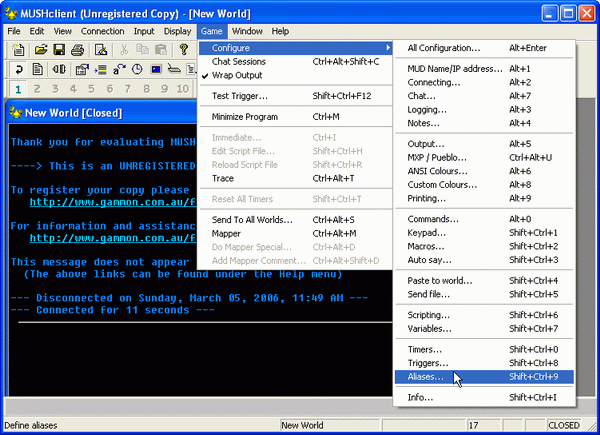 Here, click the add button. First of all, choose the actual alias for the commands you want to be executed. This is what you will type instead of the actual list of commands. For example, if you have an attack that consists of three commands, you can use the alias "att *" to replace the actual commands.
You can use wildcards to put variable information in your alias. An wildcard is represented by a "*" in your alias. In our example, "*" replaces the name of the target of the attack. You can, of course, use more than one wildcard if you need to. In the send box, put the commands you want to send when you use the alias. To get the information from the wildcards, use "%1" for the first wildcard, "%2" for the second and so on: 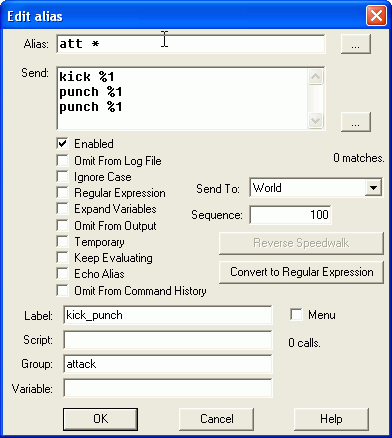 In this example, typing "att jack" will send:
kick jack punch jack punch jack It's also a good idea to choose a label and group your aliases, so it will be easier for you to keep track of them. This is the easiest thing you can do with your aliases. If you need more complex things, you should know that MushClient also offers you the possibility to send commands to your command line instead of sending them directly to the mud, or you can choose to send commands to your script, which allows you to run small scripts using an alias. These and other options can be chosen from the Send To field in the Edit Alias box. Also, if you have a script file with functions in it and you want one of these functions to be executed when you use the alias, you only need to write the name of the function in the script box at the bottom of the window. The function should have three arguments, and the values that will be passed are: name of the alias, matching line, an array of 10 wildcards. TriggersTo configure triggers, go to game->configure->triggers or use the shortcut Shift+Ctrl+8.Click the Add button and you will be taken to the Edit Trigger window. Here, first choose the line you want to be triggered. You can also set the trigger to only fire on a line of a specific color. In the send field, choose any commands you want to be sent when you receive the line. For example, maybe, when you receive the wake up message from your MUD, you want to stand up immediately: 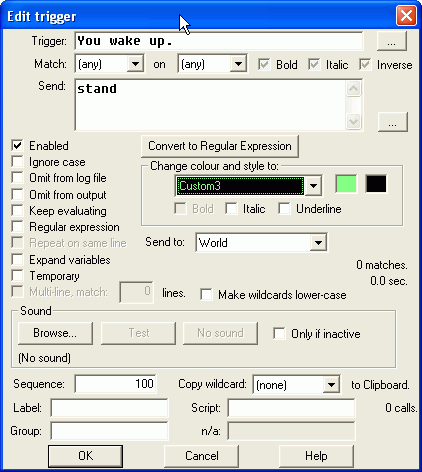 Normally, you should leave the Send To field alone, but if you need to do more complex things when a trigger fires, like running a small script or modifying a variable, you can use the drop down menu to choose where you want to send your commands. Or, if you want to run a function from your script file, write its name in the script box at the bottom, but remember that it should have three arguments.
You can choose to modify the color of the matching line, so it catches your attention, by using the change color and style drop-down menu. Choose a label and a group for your trigger and you are done. MacrosTo add a macro, go to game->configure->macros or use Shift+Ctrl+2.Unfortunately, you can't define a macro combination, you must choose one from the list of key combinations available. After you choose one, write in the send field the text you want to send. 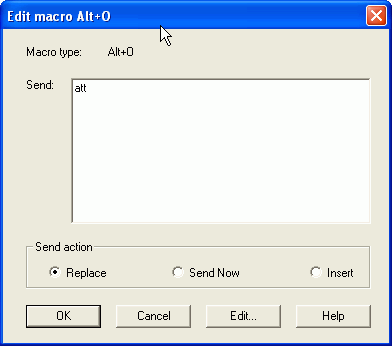 You have three options where you want to send the text. Send it directly to the mud(send now), replace what you have written in your command line(replace) or append it to the text in your command line(insert). The easiest way to get used to them, just try them. Also, if you choose the send now option, you should know that it will be first checked against your aliases and then sent to the mud. So, if you have the commands already under an alias, you don't have to write all of them again, just write the name of the alias.
Configuring your NumPadYou can also configure your NumPad to send commands when one of the numeric keypad keys is pressed. To do this, go to game->configure->keypad or press Ctrl+Shift+1.Choose what commands to send for each key. 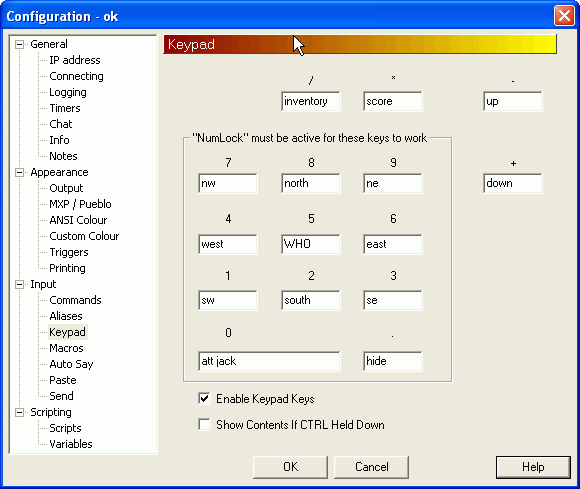 Again, you can use already configured aliases in the send field to send multiple commands or if you need to run scripts. For the keypad to work, you should have NumLock turned on. Related articles:Getting started with MushClient
Posted by: Quarc on March 5, 2006 at 09:34.
|
||
» Comments
Random Article
Search
Feeds
All Categories
Articles
Aetolia - The Midnight Age
How to create the histogram of an image using PHP
How to convert an image to grayscale using PHP
How to check if an image is grayscale in PHP
Interchanging 2 variables without the use of a third
Error launching browser window:no XBL binding for browser
Convert the AOL user session collection to a MySQL database
Introduction to Matlab
Creating a customized session handling system in PHP (part II)
Creating a customized session handling system in PHP (part I)
Firefox crashing with Yahoo! Messenger
ADL Search for oDC
Video codecs explained
Browsershots
How to use Auto-Away Message with oDC
Create complete Windows XP disk with SP2 and all updates
Data Execution Prevention error message in Windows XP
Google Mars
Logarithmic scale graphs in Excel
Urban Dictionary (or wtf does l33t mean?)
Learn more about BIOS
Backup your Firefox and Thunderbird settings
Syndicate your Yahoo 360 profile
What is Google PageRank?
'Cannot Open the File: Mk:@MSITStore' Error Message
Get your Gmail with Mozilla Thunderbird
E-Books links
Change the size of your Explorer thumbnails
Remove previews from Windows Explorer
How can I turn off system beeps?
How do I disable Internet Explorer?
What are proxies or how do I protect my anonymity?
How to set aliases triggers or macros in MushClient
What is RSS?
Palm Zire 31 fast review
oDC Installation and Basic Configuration
How I built a 2x80W amplifier (using power modules)
Leech/HotLink Protection
How to block referrer detection?
How to find out your IP address
Getting started with Mushclient
What is spyware and how do I protect my PC from it?
Stumble Upon - random surfing around the web
Automatic file backup for Windows users
How can I read foreign language sites?
Protect your web surfing privacy!
What is BitTorrent?
No more ads! Adblock for Firefox
Why use Firefox instead of Internet Explorer?
How do I create my own Yahoo ID?